

Half way through the 30 days to better food photography course now and it’s been another really enlightening week, why? Because we’ve dealt quite a bit with lighting.
Looking at the direction of light, the use of reflectors and other modifiers and also playing around with white balance. All this while trying to stick to the earlier lessons where we learnt about camera angles, depth of field and story-telling.

Pleased to say my new softbox arrived and was used extensively on the latest challenges. It provides a nice large soft light source for this sort of photography and I’m sure it will be great in portraits too. My only thought was whether the 80cm was big enough . . . so I’ve ordered a 120cm one too! But this is coming from overseas and won’t get here before the course is done.

For me, the most interesting exercise was white balance as it’s an area that many new photographers ignore so I thought I’d write some thoughts on this today.
Essentially, light comes in a range of colours depending on many factors, and while our eyes and brains are very good at interpreting this light and understanding what is white and what is coloured, camera sensors cannot do this automatically. As a result we sometimes get a colour cast on shots where the wrong WB is selected.
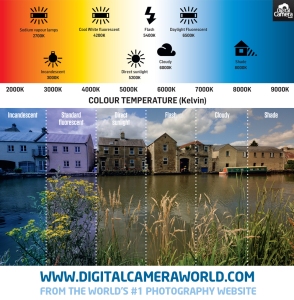
The colour of light is measured on a temperature scale with the units of degrees Kelvin (°K). And the typical range goes from 2000K to 9000K
To allow for the colour that is cast by different lighting sources we have a tool called ‘white balance’ where we instruct the camera to deliberately adjust the colours in an image based on what we tell it the main light source is. For example, tungsten lights (regular old-fashioned lightbulbs) give off a very orange colour cast although this isn’t always obvious to us. Opposite to orange on the colour wheel is blue and so your camera will add blue to the image to neutralise the orange.
You can test this theory by taking a tungsten white balance photo in regular daylight and see how blue the image looks.
In fact you can put this to good use to simulate a cool blue morning or even moonlight as I have done here with this shot. The original was shot in daylight but I adjusted the white balance in post-production (along with a few other things) to achieve a moonlit effect.

Most cameras give you a few simple options for setting white balance based on the scene; daylight, shade, cloud, flash, tungsten, fluorescent as well as Auto and Custom. I always select the most appropriate option while I’m shooting and then tweak in post-production. If you shoot in RAW then you can colour correct more easily in post-production. If you shoot in JPEG only, it’s much more difficult to correct and hence more important to get right in camera and not rely on Auto for this.
Below shows the impact of WB on a scene. All that is changed in each case is the WB setting.

The optimum way of fixing White Balance is to do a custom WB setting before you shoot. You should refer to your camera’s instruction manual for how to do this but it basically involves photographing a piece of white paper in the environment you are planning to take photographs and the camera will determine the appropriate WB temperature.
Of course this is tricky if you’re on a photowalk with changing light. But at a fixed location or in a studio it’s a lot easier.
I had problems earlier in the course where I was trying to shoot with a mix of flash and kitchen (tungsten) lights. With a wide aperture, there wasn’t quite enough light from the kitchen lights only and so a little bit of flash was needed. As the aperture was reduced and less kitchen light allowed in the flash had to work harder to balance the light. As a result, with WB set to tungsten the pictures got cooler as the amount of warm kitchen light reduced and the amount of cooler flash light increased making it very tricky to balance.
The solution here is to try and get the same colour from both sources and so I put an orange ‘gel’ on my flash to artificially warm up the cooler flash light to be closer to the kitchen lights and hence the tungsten WB worked OK.

Your task this week is to work out how to change the WB setting on your camera. Try taking the same scene with different settings to judge the impact. And commit to getting off manual and selecting the right white balance each time you go out shooting.